Photo Synchronisation
Photo Synchronisation allows you to upload or download photos to/from the photoSentinel gallery.
Photo Synchronisation
Photo Synchronisation allows you to upload or download photos to/from the photoSentinel gallery.
You can synchronise your local copy of photos with those in the gallery from the Photo Management page on Control Hub. This includes uploading photos to the gallery that you have saved to the SSD and downloading photos to your local storage. This functionality is designed to replace the older ‘Utilities’ Java application.
This feature is supported on Google Chrome and Microsoft Edge browsers.
NOTE: Cloud services plans allow you to forward your photos once. If you have already forwarded photos once and plan to use photoSentinel Utilities to download these photos again, you will need to purchase more data for photo forwarding.
Upload Photos
Uploading photos from a local folder to an installation is typically used after collecting photos from the photoSentinel’s local SSD storage. An example would be local SSD photo collection after a high-frequency shooting session, where it may not be economical to upload every photo over the cellular network.
Follow the steps below to upload photos:
- Login to Control Hub
- Select your installation from the search field
- Navigate to the Photo Management tab
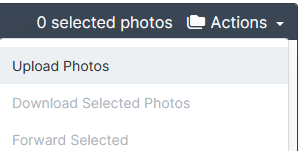
- Click the Actions drop-down and then click the Upload option.
- Select the folder on your computer that contains the images that you want to upload. Your browser may prompt you to approve access to the local folder.
- The browser will scan the folder and queue those photos which have not yet been uploaded, before prompting you to upload them.
- Keep the browser window open to continue uploading.
Download Photos
Follow the steps below to download photos:
-
Login to Control Hub.
-
Select your installation from the search field.
-
Navigate to the Photo Management tab.
-
There are multiple settings available to select the desired photos (selected photos are marked with a green tick):
-
If you want to download only a small number of photos, you can select them by clicking on each image before moving to the next step.
-
If you want to download a larger number of photos, consider using the Date range filter in conjunction with the Select All button.
-
The Time range filter is useful for when you only want to retrieve images between specific times of day for the selected dates, such as between 11:30am and 12:30pm to retrieve only the images captured when the sun is highest in the sky on each day.
-
You can also select all images only on the current page with the Select Page button.

-
-
Once you have selected the desired photos, click the Actions drop-down and then click the Download option.
-
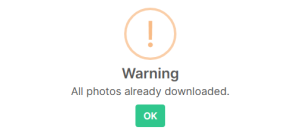
Select the folder on your computer that you would like to download the photos to. Your browser may prompt you to approve access to the local folder. The function will then scan the folder to exclude any images which are already downloaded from the queue. If the photos from the selection already exist on your local storage, a message will appear to indicate this.
-
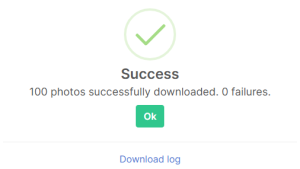
Keep the browser window open to continue downloading the photos. You should see a Success message once the photos have all been downloaded.